This page is open source. Improve this page.
Xcode History
Xcode是如何诞生的?How did Xcode come into being
Xcode是一款用于开发Mac和iOS应用程序的综合性开发工具,它由苹果公司开发和维护。Xcode最初的版本于2003年发布,自那时以来,它已经成为Mac和iOS开发的标准工具之一。
Xcode的诞生可以追溯到1997年,当时苹果计算机公司正在寻求一款更好的工具来开发它的操作系统和应用程序。此时,苹果正在使用CodeWarrior和MPW等开发工具,但它们并不完全满足苹果的需求。
苹果的开发团队决定开发一款自己的集成开发环境(IDE),旨在更好地支持苹果的开发工作流程。于是,在1997年,苹果成立了一个名为Project Builder的团队,该团队的任务是开发一款全新的IDE。
Project Builder最初基于NeXTSTEP操作系统的工具,但随着苹果收购NeXT,它也开始使用Mac OS X技术。2003年,苹果发布了Xcode 1.0版本,这是一款全新的IDE,它汇集了Project Builder和一些其他开发工具的功能。随着时间的推移,Xcode的版本不断更新和改进,逐渐成为苹果开发的标准工具。
今天,Xcode仍然是苹果开发应用程序的主要工具之一。它提供了一个综合性的工作环境,支持多种编程语言和开发框架,帮助开发人员更快、更高效地开发和部署应用程序。
LLVM是Apple官方支持的编译器,而该编译器的前端是Clang,这两个工具都被集成到了Xcode里面。在这篇文章中,我们来了解一下LLVM和Clang背后的故事。
此外,Clang有一个重要的衍生项目是静态分析工具,能够通过自动分析程序的逻辑,在编译时就找出程序可能的bug,这个功能叫做ARC。ARC的实现让当时的广大开发者们大为惊愕。
除了LLVM核心和Clang以外,LLVM还包括一些重要的子项目,比如一个原生支持调试多线程程序的调试器LLDB和一个C++的标准库libstdc++。不光是Apple,很多的项目和编程语言都从LLVM中取得了关键性的技术。
苹果用户界面Aqua背后的故事
IDE Tutorials
Collaboration with Individual Teams
Make sure you
How to share an Individual Apple iOS Developer Account
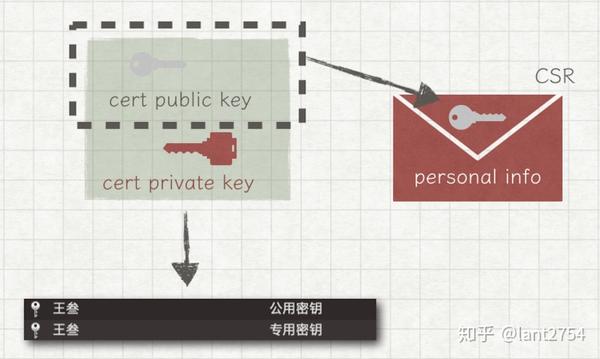
There should be at least 2 files you need to import in Keychain: - development certificate - distribution certificate Also, not sure, but it might help: - the original self-signed certificate you submitted to apple (the CSR)
The certificates need to be generated from the computer that originally signed the CSR and imported in the second computer’s keychain. Also, be sure to import the certificates in the login keychain.
ps. close XCode before importing the certificates - or close/restart after importing.
Certificate Signing Request for Mac
Create a certificate signing request
- Launch Keychain Access located in /Applications/Utilities.
- Choose Keychain Access > Certificate Assistant > Request a Certificate from a Certificate Authority.
- In the Certificate Assistant dialog, enter an email address in the User Email Address field.
- In the Common Name field, enter a name for the key (for example, Gita Kumar Dev Key).
- Leave the CA Email Address field empty.
- Choose “Saved to disk,” then click Continue.

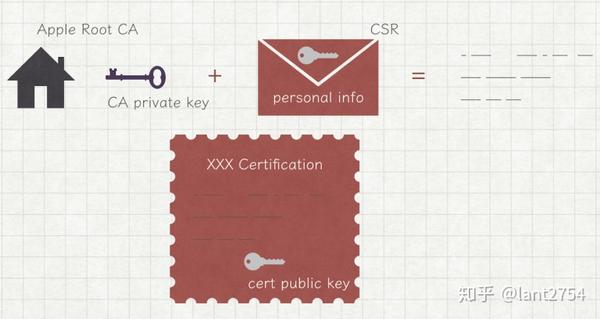
certificates at developer.apple.com, sign the certificate request, then download the certificate. You can then import the certificate into your keychain.
relevant link
UDID on iPhone
Finding the UDID using Mac:
- Connect your device to a Mac device using a USB cable and tap on your device name in the sidebar menu. Next, simply click on the tab under the device name.
- Now, you will see the UDID of your iOS device (it will also display other information like the serial number, etc.). Right click on this info and copy the UDID.
How to find iPhone’s UDID

Provisioning File
Apple Developer 憑證與Provisioning Profile更新
Apple開發者帳號登入之後,選擇Certificates, Identifiers & Profiles設定會看到”Certificates”,”Identifiers“,”Devices“,”Profiles“,”Keys“的側邊欄
Certificates:憑證管理,主要是推播憑證(Apple Push Services)、開發者的mac電腦的憑證(Development)和這個開發者帳號的發佈憑證(iOS Distribution)
Identifiers:App的Bundle id ,自己創的或是同帳號在XCode同步創建的App id都會列在此表列出
Devices:App測試和Ad Hoc分發配置可以在此添加該測試機的UUID
Profiles:配置文件,就是有關於使用這個Provisioning Profile的app被合法准許的使用期間、創建的團隊、簽署的開發憑證有效期到何時等等的資訊一併打包進這個檔案裡
Keys:可以提供apple推播、地圖、音樂服務的金鑰(P8憑證就是在此產出)
git problem
Git Xcode project.pbxproj
project.pbxproj 檔的內容決定專案 Project navigator 顯示的檔案清單和順序,因此這也解釋了為何多人合作時它容易產生衝突。因為每個人會新增刪除檔案,有時還會調整檔案的順序,於是 git 就不知該如何合併,它不知該保留刪除哪個檔案,哪個檔案要在前面,哪個要在後面。
但是由於每個人都認真地寫著 App,新增了很多檔案,因此 project.pbxproj 往往會有很多衝突,一個個解決十分辛苦。
其實 project.pbxproj 大部份的衝突解法都是同時保留本機端和遠端的檔案,畢竟你不想刪除自己辛苦寫的程式,也不敢刪除隊友辛苦寫的程式,所以我們可以透過 .gitattributes 檔,告訴 git 在 project.pbxproj 遇到衝突時,同時保留本機端和遠端的修改,如此即可解決 project.pbxproj 大部分的衝突。
git ingore 忽略UserInterfaceState.xcuserstate xcschememanagement.plist
项目开发中,经常遇见 xcuserstate 隔几秒就会变化的问题,由于这个文件包存放的数据并不重要,只是一些GUI状态,比如窗口位置,打开的标签页,在项目检查等展开的节点、 简单地调整大小的Xcode窗口将这个文件来改变和修改您的源代码控制系统进行标记。
.gitignore
git rm -r --cached .
git add .
git commit -m "Remove ignored files"
gitignore
# Finder
.DS_Store

# Xcode - User files
# Finder
.DS_Store

# Xcode - User files
xcuserdata/

**/*.xcodeproj/project.xcworkspace/*
!**/*.xcodeproj/project.xcworkspace/xcshareddata

**/*.xcodeproj/project.xcworkspace/xcshareddata/*
!**/*.xcodeproj/project.xcworkspace/xcshareddata/WorkspaceSettings.xcsettings

# For Swift Package Manager, Package.resolved file
!**/*.xcodeproj/project.xcworkspace/xcshareddata/swiftpm

**/*.playground/playground.xcworkspace/*
!**/*.playground/playground.xcworkspace/xcshareddata

**/*.playground/playground.xcworkspace/xcshareddata/*
!**/*.playground/playground.xcworkspace/xcshareddata/WorkspaceSettings.xcsettings
这是一个典型的.gitignore文件,用于忽略特定的文件和文件夹,以便在Git仓库中不被追踪和提交。
第一行指示Git忽略所有名为.DS_Store的文件。.DS_Store是MacOS Finder文件夹的元数据文件,通常不需要跟踪或提交到Git仓库中。
第二行指示Git忽略所有名为xcuserdata/的文件夹。这是Xcode用户数据文件夹,它包含每个用户在Xcode项目中的个性化设置。它通常不应该跟踪或提交到Git仓库中,因为它不是项目本身的一部分。
第三行指示Git忽略所有名为.xcodeproj/project.xcworkspace/*的文件,但保留.xcodeproj/project.xcworkspace/xcshareddata文件夹。这是Xcode项目的工作区文件,包括项目配置和其他元数据。通常,这些文件不应该跟踪或提交到Git仓库中,但是在一些情况下可能需要将xcshareddata文件夹包括进来,例如,当多个开发人员共享相同的项目设置时。
Summary
iOS打包的那一些事情 - ios小袁君的文章 - 知乎
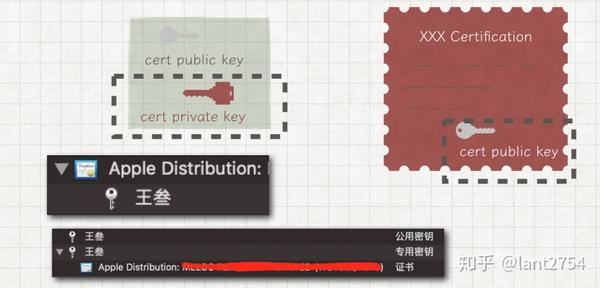
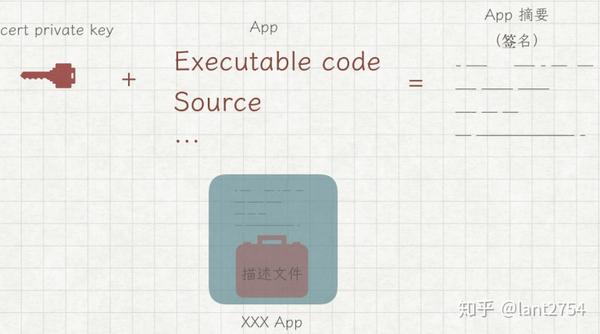
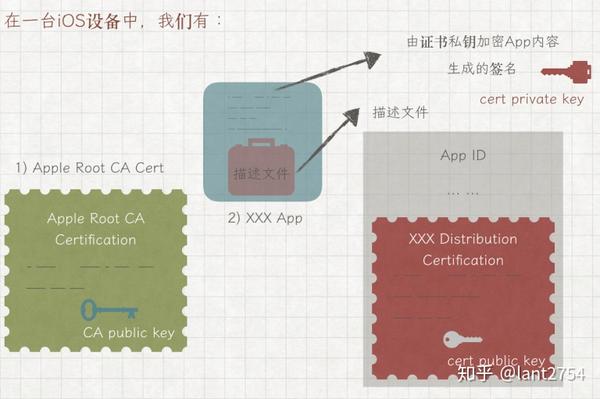
Mark Tricks
TODO: Mark a task that needs to be done, using the format: // TODO:
FIXME: Mark a bug that needs to be fixed, using the format: // FIXME:
!!!: Mark a section that needs to be reviewed, using the format: // !!!:
???: Mark a section that needs to be clarified, using the format: // ???:
MARK: Mark a section of code, using the format: // MARK:

TODO: 标示处有功能代码待编写,使用方法:// TODO:
FIXME: 标示处代码需要修正,使用方法:// FIXME:
!!!: 标示处代码需要注意,使用方法:// !!!:
???: 标示处代码有疑问,使用方法:// ???:
MARK: 标记,和#pragma mark效果相同,使用方法:// MARK:

#pragma mark -
#pragma mark TODO:  标示处有功能代码待编写
#pragma mark FIXME: 标示处代码需要修正
#pragma mark !!!:  标示处代码需要注意
#pragma mark ???:  标示处代码有疑问
#pragma mark MARK:  标记,和#pragma mark效果相同
///TODO:标示处有功能代码待编写
///FIXME:标示处代码需要修正
///!!!:标示处代码需要注意
///???:标示处代码有疑问
///MARK:标记,和#pragma mark效果相同

//FIXME: Remove all references to jiltedExLover

Code Snippet


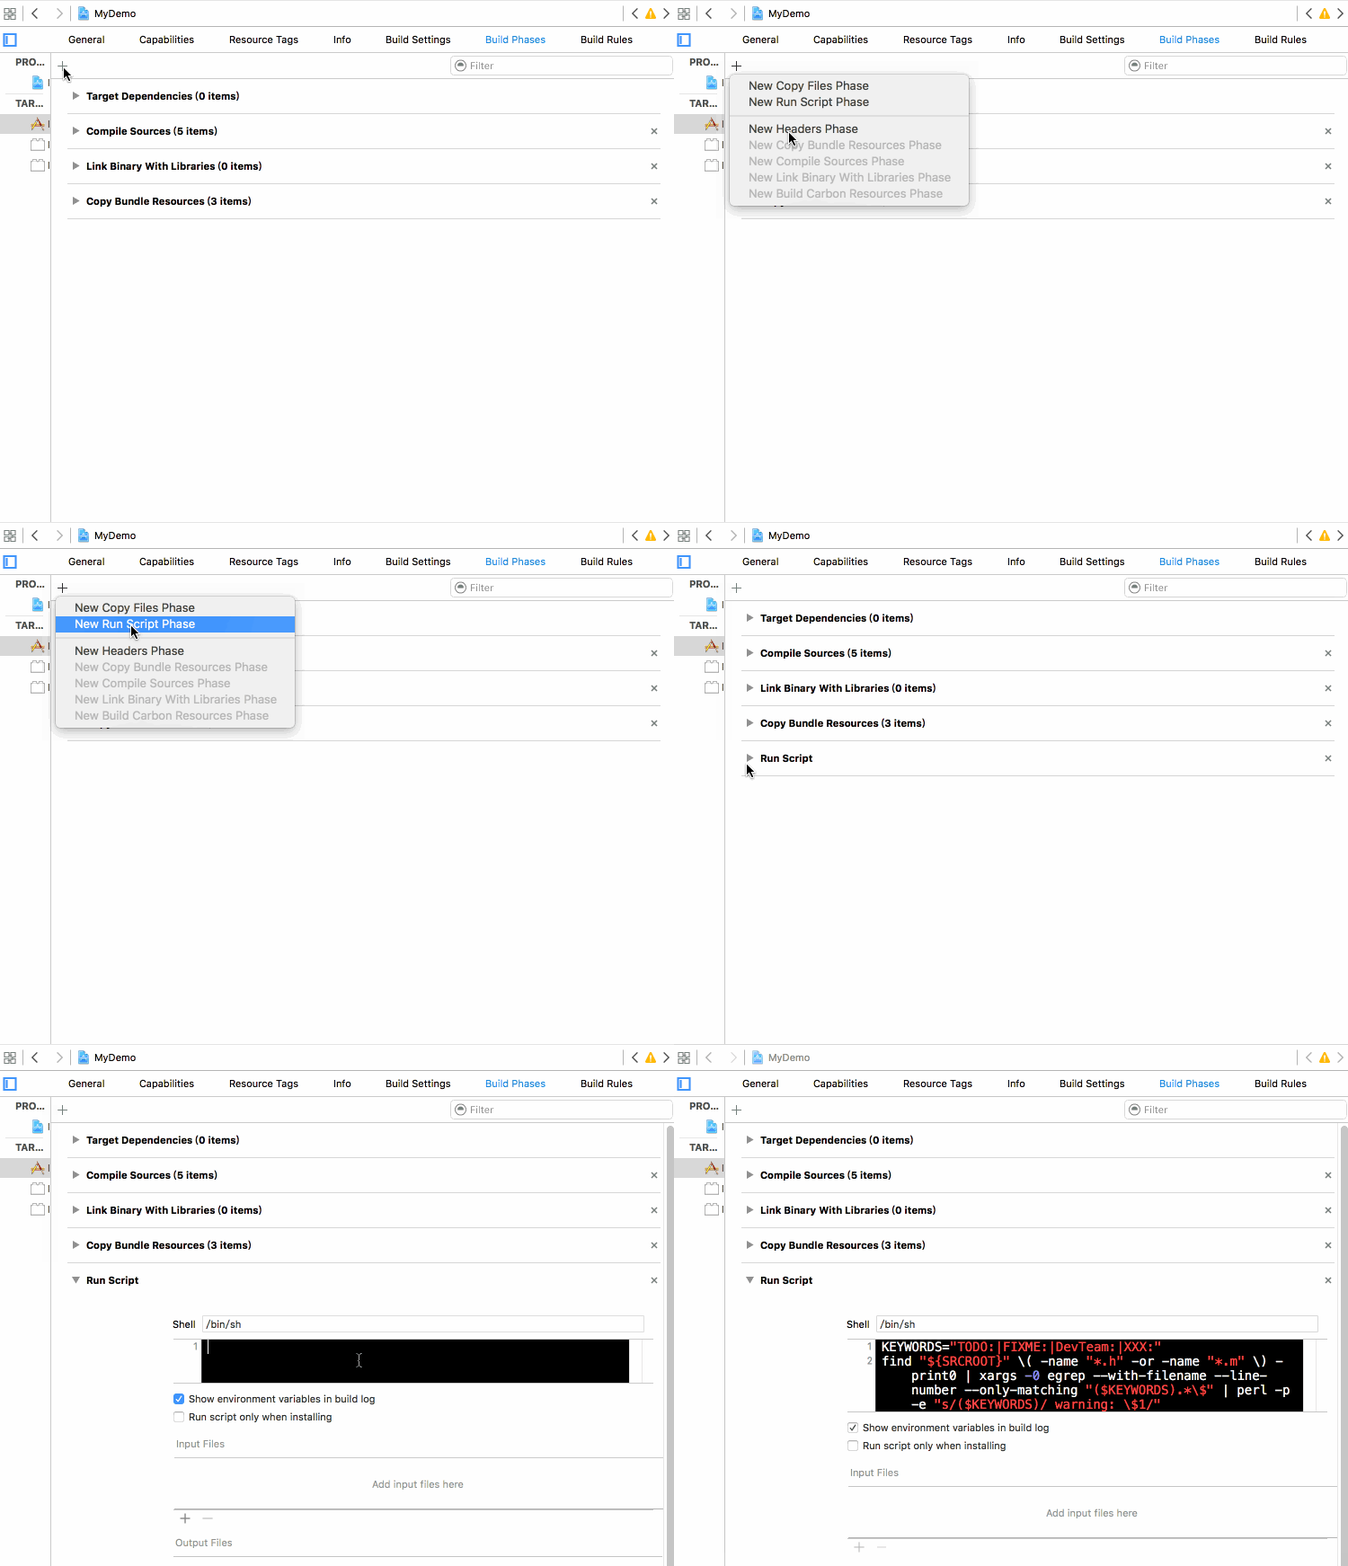
TAGS="TODO:|FIXME:"
ERRORTAG="ERROR:"
find "${SRCROOT}" \( -name "*.h" -or -name "*.m" -or -name "*.swift" \) -print0 | xargs -0 egrep --with-filename --line-number --only-matching "($TAGS).*\$|($ERRORTAG).*\$" | perl -p -e "s/($TAGS)/ warning: \$1/" | perl -p -e "s/($ERRORTAG)/ error: \$1/"
# Full type: Including Mark, ???, !!!

TAGS="TODO:|FIXME:|MARK:|\?\?\?:|\!\!\!:"
ERRORTAG="ERROR:"
find "${SRCROOT}" \( -name "*.h" -or -name "*.m" -or -name "*.swift" \) -print0 | xargs -0 egrep --with-filename --line-number --only-matching "($TAGS).*\$|($ERRORTAG).*\$" | perl -p -e "s/($TAGS)/ warning: \$1/" | perl -p -e "s/($ERRORTAG)/ error: \$1/"

Explanation of Bourne shell Script
This script is used for searching and highlighting specific tags and errors in source code files during build time. The script uses the find command to locate files with extensions .h, .m, and .swift in the SRCROOT directory. The egrep command is used to search for lines that match the regular expressions specified in TAGS and ERRORTAG.
If any line matches the tags or errors, it is displayed as a warning or error message using the perl command. The warning or error message is then displayed with the file name, line number, and the actual line containing the tag or error.
Now maybe you’re thinking, what’s the point? Don’t I still have to dig through the program, going file by file, clicking the dropdown menu, trying to find that TODO tag? What if the project has dozens of files? Won’t my TODO and FIXME tags get lost in the mess and forgotten? If only there was a way to get Xcode to give you a warning if a TODO tag is left unanswered!
Click on the little plus sign at the trop right and select Run New Script Phase. The idea here is that you’re adding another step to the build process when Xcode builds your project. If you unwrap the arrow for the run script item, you’ll see a black box that will hold script that Xcode will run on every build.
Now build your program. If you have any //TODO: or //FIXME: tags, Xcode will throw you a warning. If you write in an //ERROR: tag, Xcode will throw you an error and not run. (Note: you may have to move your script up in the build order.)
Employ this little trick, and never leave another item on your TODO list undone!

#pragma mark -
#pragma mark -
#pragma mark - TableViewDelegate
Xcode中那些让人焕然一新的特殊注释#pragma mark、TODO、FIXME、MARK
从技术角度讲,以 #pragma 开头的代码是一条编译器指令,一个特定于程序或编译器的指令。它们不一定适用于其它编译器或其它环境。如果编译器不能识别该指令,则会将其忽略。
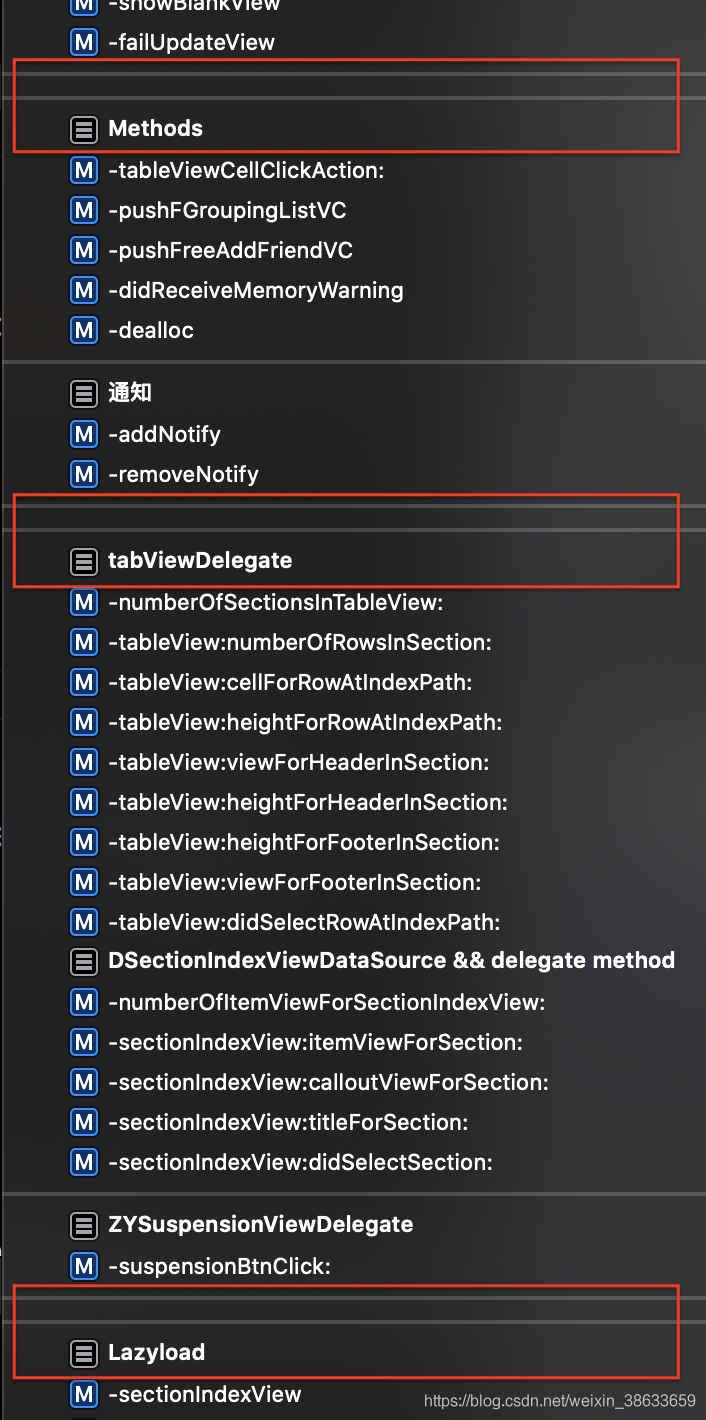
其作用是,告诉Xcode编译器,要在编辑器窗格顶部的方法和函数弹出菜单中将代码分隔开,如下图所示:
From a technical point of view, the code starting with #pragma is a compiler directive, a specific directive for the program or compiler. They may not be applicable to other compilers or other environments. If the compiler cannot recognize the directive, it will be ignored.
Its purpose is to tell the Xcode compiler to separate the code in the editor window top method and function pop-up menu, as shown in the following figure:
Xcode Doc
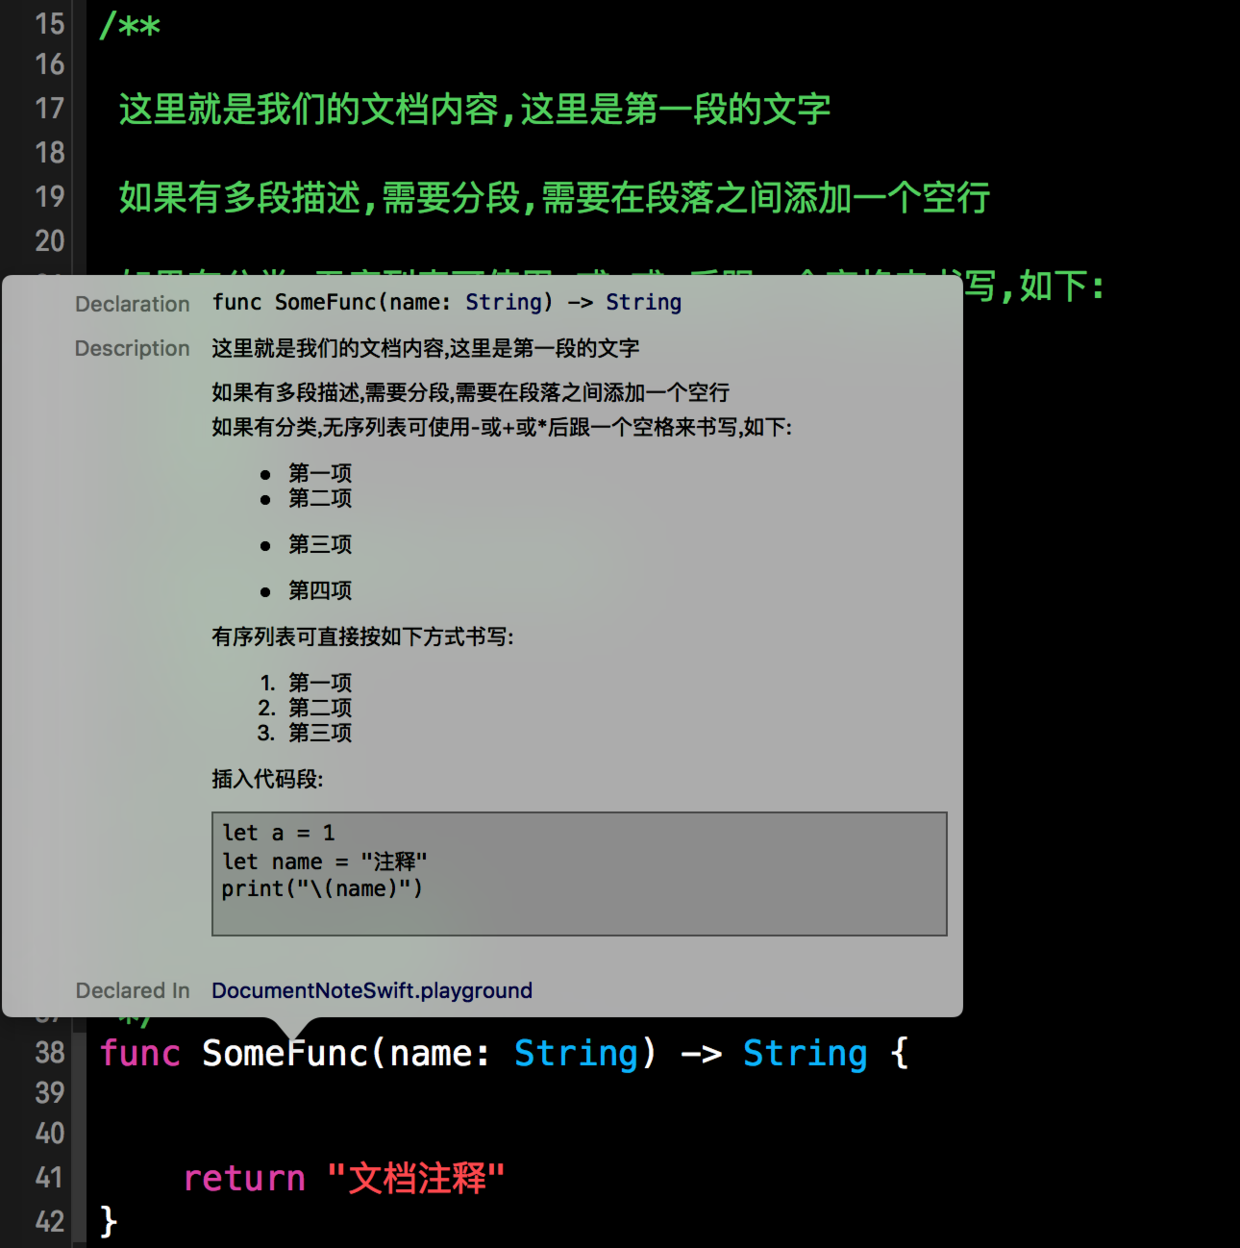
Old Version
/**

这里就是我们的文档内容,这里是第一段的文字

如果有多段描述,需要分段,需要在段落之间添加一个空行

如果有分类,无序列表可使用-或+或*后跟一个空格来书写,如下:
- 第一项
- 第二项
+ 第三项
* 第四项

有序列表可直接按如下方式书写:
1. 第一项
2. 第二项
3. 第三项

插入代码段:
`` `
let a = 1
let name = "注释"
print("\(name)"
`` `
*/
func SomeFunc(name: String) -> String {

  return "文档注释"
}
DocC
我个人建议是:以前代码注释就让它去吧,现在就都是用这个统一风格。

Cocoa 代码注释与文档生成
摘要和说明
文档注释的开头部分将成为 “摘要“ Summary,余下的其他内容将一起归入 “讨论” Discussion。
如果文档注释以段落以外的任何内容开头,则其所有内容都将放入讨论中。
Twitter By Paul Hudson
Xcode tip #14: One of my most commonly used Xcode shortcuts is Cmd+/ to toggle comments for the current line or selection, but another useful one is Option+Cmd+/ – press that directly before a method to have Xcode generate a documentation comment, including its parameters.
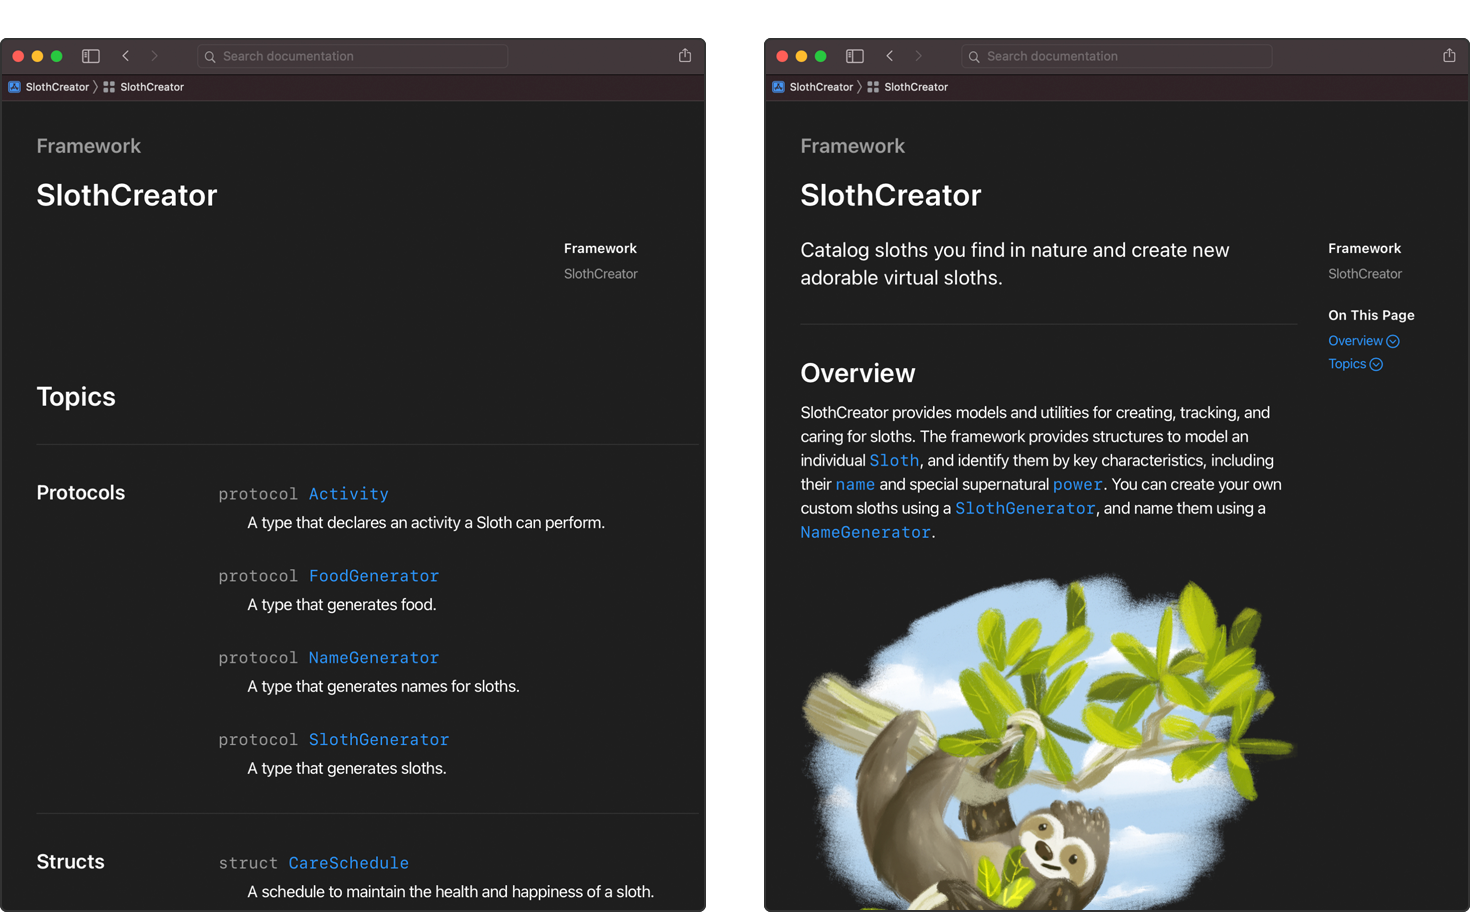
Structure of documentation pages
Adding structure to your documentation pages
CLI Build Cocoapods
xcodebuild -workspace TestDocc.xcworkspace -parallelizeTargets docbuild

2023-05-20 23:00:32.671 xcodebuild[50700:2620221] Writing error result bundle to /var/folders/81/srpknvzx31nctp39xxlvx_200000gn/T/ResultBundle_2023-20-05_23-00-0032.xcresult

2023-05-20 23:00:32.694 xcodebuild[50700:2620221] Requested but did not find extension point with identifier Xcode.IDEFoundation.IDEResultKitSerializationConverter

xcodebuild: error: If you specify a workspace then you must also specify a scheme.  Use -list to see the schemes in this workspace.
这个错误的原因是你在使用 xcodebuild 命令构建一个 Xcode workspace,但没有指定一个 scheme。每个 Xcode workspace 都可能有多个 scheme,每个 scheme 定义了如何构建一个或多个 target。
你可以使用 -list 参数查看 workspace 中的所有 scheme:
xcodebuild -workspace TestDocc.xcworkspace -list
这会列出所有的 scheme。然后你可以选择一个 scheme,将其添加到你的 xcodebuild 命令中,如下所示:
xcodebuild -workspace TestDocc.xcworkspace -scheme YourSchemeName docbuild
其中,YourSchemeName 是你从 -list 输出中选择的 scheme 名称。这样 xcodebuild 就知道你想要构建哪个 scheme,以及如何构建它了。
DocC Deploy on GitHub
如何把 Swift DocC 文檔託管到 Web Server 或 GitHub
DocC for Cocoapods
Host and Automate your DocC documentation
The docbuild command builds documentation as we might expect from the name, and we need the -parallelizeTargets flag to build modular workspaces.
We’ve selected the -project flag rather than the -workspace flag for our project with the associated -scheme, however, you may need to change this on a case-by-case basis, for example with CocoaPods projects.
Is it possible to specify the build target for DocC? (I want to exclude libraries installed with CocoaPods)
DocC will generate documentation for all the Swift frameworks and libraries that are part of the scheme—either directly or as a dependency of another target—that you are building, including external dependencies for which you have the source code (such as SwiftPM checkouts or CocoaPods). Please submit feedback with a description of your use case on the Feedback Assistant website.
DocC for Objc
DocC for Objective-C static library
Code Snippet
iOS Xcode 代码块(Code Snippet)
Xcode CLI
xcodebuild -project TestingProject.xcodeproj -derivedDataPath ../../docsData -scheme TestingProject -destination 'platform=iOS Simulator,name=iPhone 14 Pro'
DISAMBIGUATOR for Downloadable Project
//
// See the LICENSE.txt file for this sample’s licensing information.
//
// SampleCode.xcconfig
//

// The `SAMPLE_CODE_DISAMBIGUATOR` configuration is to make it easier to build
// and run a sample code project. Once you set your project's development team,
// you'll have a unique bundle identifier. This is because the bundle identifier
// is derived based on the 'SAMPLE_CODE_DISAMBIGUATOR' value. Do not use this
// approach in your own projects—it's only useful for sample code projects because
// they are frequently downloaded and don't have a development team set.
SAMPLE_CODE_DISAMBIGUATOR=${DEVELOPMENT_TEAM}
Xcode 14.3 Bug for Pod
Unable to build project in Xcode 14.3 beta due to missing arc dir at /Applications/Xcode-beta.app/Contents/Developer/Toolchains/XcodeDefault.xctoolchain/usr/lib
post_install do |installer|
  installer.generated_projects.each do |project|
    project.targets.each do |target|
        target.build_configurations.each do |config|
            config.build_settings['IPHONEOS_DEPLOYMENT_TARGET'] = '11.0'
         end
    end
  end
end
Swift Package Manager through Proxy
ClashX Pro 开增强已解决!(这个免费)
Download ClashX Pro With enhanced mode and Native Apple Silicon support at AppCenter for free permanently.
libgit2 for Xcode 【已失效】Xcode GUI 添加 SPM 依赖的时候访问不了 github,无视 git config proxy 配置解决方案
此 openradar 中提出者指出了原因:Xcode 调用 libgit2 时传入了 GIT_PROXY_NONE,无视了 git config 中的 proxy 配置。作者说用了自己打的 libgit2 包可以解决问题,但没说具体怎么操作。
看了一下 libgit2 里的声明:
	/**
	 * Do not attempt to connect through a proxy
	 *
	 * If built against libcurl, it itself may attempt to connect
	 * to a proxy if the environment variables specify it.
	 */
	GIT_PROXY_NONE,
里面说如果构建时使用了 curl (一般都会使用 curl?)会遵循 curl 的配置,于是在 ~/.curlrc 中加入一行(具体 proxy 依你自己的配置来指定):
proxy = socks5://127.0.0.1:1080
验证了一下,Xcode 可以正常使用 proxy 添加 SPM 依赖了。更新:似乎不好使
注:
上面是为了解决在 Xcode GUI 中添加新的 SPM 依赖时遇到的问题,由于 Xcode 的项目不支持 Package.swift,目前只能使用 GUI 来添加。也可以使用旁路由来解决,Xcode 所在的机器只需要设置网关为旁路由的网关即可,旁路由上跑 proxy。
如果项目之前已经添加过 SPM 了,解析时卡住的话可以用命令行操作,具体可参见 stackoverflow
export all_proxy=<your_proxy>:<your_port>

xcodebuild -resolvePackageDependencies -scmProvider system

export https_proxy=http://127.0.0.1:YOURPORT http_proxy=http://127.0.0.1:YOURPORT all_proxy=socks5://127.0.0.1:YOURPORT

# 如果是project 使用以下命令
xcodebuild -resolvePackageDependencies -scmProvider system -project YOURPROJECT.xcodeproj

# 如果是workspace 需要指定scheme,或者使用-list
xcodebuild -resolvePackageDependencies -scmProvider system -list -workspace HackrNewsApp.xcworkspace
经过查询Xcode的使用的自带 git 程序为 com.apple.dt.Xcode.sourcecontrol.Git,在 Xcode 里面的 SPM 下载 github 时候可以到控制台查看具体程序ps aux|grep com.apple.dt.Xcode,显示结果如下:

# 前提: 你有一个代理

# 因为直接打开Xcode是不会走代理的。

# 以你需要现退出Xcode,然后在命令行里输入

open -a Xcode.app

# 保险起见你还可以在这之前加一句
export ALL_PROXY=http://127.0.0.1:<PORT>
Local SPM
Getting ’no such module’ error when importing a Swift Package Manager dependency
编译架构和 Apple Silicon
Xcode 中使用 SPM 和 Build Configuration 的一些坑
在模拟器上排除 arm64 导致的问题
在 Apple Silicon 的时代,默认情况下 Xcode 会使用 arm64 架构运行。这时候,自带的 iOS 模拟器也会跑在 arm64 下。如果你在项目里使用了一些老旧的以二进制发布的库,比如 fat binary 做的 framework,或者是不包含模拟器 arm64 的 .a 的文件,那么很可能在 Apple Silicon 的 mac 上,以模拟器为目标进行链接时,看到类似这样的错误:
building for iOS Simulator, but linking in object file built for iOS, for architecture arm64
这是因为虽然库中包含了 arm64,但是其中标明了它是用在实际设备而非模拟器上的。网络上常见的办法,会教你在 EXCLUDED_ARCHS 里为 simulator 添加 arm64,用来把这个架构排除出去。
EXCLUDED_ARCHS[sdk=iphonesimulator*] = arm64
这是一个治标不治本的“快速疗法”,加入这个设定可以让你编译通过并运行,但是你需要清楚了解到这么做的弊端:因为 arm64 被排除了,所以在 iOS 模拟器上,只有 x86_64 这一个架构选择。这意味着你的整个 app 都会以 x86_64 进行编译,然后跑在 x86_64 的模拟器上。而在 Apple Silicon 的 mac 上,这个模拟器其实是使用 Rosetta 2 跑起来的,这意味着性能的大幅下降。
对于 .debug,ONLY_ACTIVE_ARCH 为 true,编译目标为 arm64 的 iOS 模拟器,因此 SPM 只会给出 arm64-apple-ios-simulator 版本的编译结果。但是项目本身设定了 EXCLUDED_ARCHS arm64,它在链接包时,需要的其实是 x86_64 模拟器版本的包。砰!
对于老旧二进制的依赖,最正确的做法是催促维护者赶快适配 xcframework。另一种可行的方案,是 hack 一下二进制,修改 arm64 slice 的目标字段,“欺骗” Xcode 让它认为这个二进制的 arm64 就是为模拟器编译的。这种方法在这里有详细解释,作者也发布了相关的 arm64-to-sim 工具,如有需要,可以暂时酌情使用。
利用 config.build_settings["EXCLUDED_ARCHS[sdk=iphonesimulator*]"] = "arm64" 排除 arm64 的模拟器,以让老代码能够在 x86_64 的环境下编译运行,最终以 Rosetta 的形式在 M-Chip 的 Mac 上运行。
post_install do |installer|
    installer.pods_project.targets.each do |target|
        target.build_configurations.each do |config|
        	...
					config.build_settings["EXCLUDED_ARCHS[sdk=iphonesimulator*]"] = "arm64"
        	...
    		end
  		...
		...
end
arm64 / x86-64 和 intel/amd
arm64 / x86-64 和 intel/amd
伴随着9月上旬iOS16的推送,作为开发者的一员,紧随其后升级了Xcode到14.0。相比Xcode13,Xcode14打包的处理器架构Architectures默认支持的已经只有 arm64 。这样在也就意味着通过Xcode14构建的产物,已经不能在iPhone5/iPhone5C上使用。这个改变引发了内心中的如下几个疑问:
- arm64 含义是什么?
- 处理器架构 含义是什么?
- Intel和AMD 有什么区别?
1 arm64 含义是什么?
arm64可以拆成arm和64两部分。其中arm指处理器采用的架构方式,它是基于精简指令集(RISC)的处理器架构。64是相对32位而言,代表支持更大的内存和更多的寻址。由于精简指令集(RISC)低耗电的特性,使arm架构的处理器非常适用于移动通讯领域。
应用于iPhone系列手机的arm指令集除arm64外,还有armv7 armv7s arm64e 等。一个iPhone生产时,已经选定了特定的CPU,也就只能运行对应的指令集应用。arm处理器的指令集,都是向下兼容的。例如armv7指令集兼容armv6,只是使用armv6的时候无法发挥出其性能,无法使用armv7的新特性,从而会导致程序执行效率没那么高。
2 处理器架构 含义是什么?
处理器,就是通常讲的计算机部件CPU。处理器架构,是给同一系列的CPU产品定的一个规范。除了上面所提的基于精简指令集(RISC)的arm架构外,市面上同样基于精简指令集的还有RISC-V架构和MIPS架构。与精简指令集(RISC)相对应的是基于复杂指令集(CISC),其标志性架构就是常听到的x86。
不同架构的处理器有各自的优势,其便捷使用场景如下[1]:
| 指令集 | 架构 | 使用场景 |
|---|
| RISC | arm | 移动设备 |
| RISC | RISC-V | 家用电器、传感器、工业控制中心、LOT设备 |
| RISC | MIPS | 电子产品、网络设备、个人娱乐装置 |
| CISC | x86 | PC、服务器、AI等 |
其中RISC-V是基于BSD协议许可的免费开放指令集架构,相比ARM和x86都有一定的优势,已经有人把它成功应用在手机上RISC-V Android10。在越来越重视自主可控的大环境下,可能基于该架构的CPU会被更多的商家所采用。
3 Intel和AMD 有什么区别?
Intel和AMD是生产x86架构CPU的两大厂商。Intel凭借其结构、设计和工艺的精进主打性能强、功耗低。AMD起步时跟在Intel后面亦步亦趋,后面凭借大胆使用新技术、新工艺,一度有后发制人的趋势,但是无奈Intel凭借狡诈的商业策略和巨无霸的市场地位,巧妙地应对了AMD的挑战。AMD现在凭借其较高的性价比和更多的核心数,也受到很多DIY人士的喜爱。
追根溯源,Intel和AMD 创建者都来源于同一家公司,二者的相互竞争,演绎精彩商业斗争的同时,也促进了处理器的不断更新换代,不断按照摩尔定律的语言飞速演进[2]。
延伸
听说最多的手机芯片有高通骁龙、华为麒麟、三星Exynos以及苹果的A系列,它们都是芯片的设计者。它们的最终的生产都是外包的,台积电和三星是全球最有竞争力的两个外包工厂。从华为麒麟的知名度看,设计芯片的能力,国内是不缺乏的,被MG卡脖子的地方恰恰是芯片的生产。这也是国内一直强调大力发展实业,避免陷入金融业和房地产泡沫的底层逻辑。
App icon in Xcode
App Icon Generator is no longer needed with Xcode 14
Regex with Xcode Find & Replace
Xcode + Regular Expression = 🤯
firstNameTextField.placeholder = NSLocalizedString("person.firstName.placeholder", comment: "")
lastNameTextField.placeholder = NSLocalizedString("person.lastName.placeholder", comment: "")
ageTextField.placeholder = NSLocalizedString("person.lastName.placeholder", comment: "")
firstNameTextField.placeholder = NSLocalizedString\((".*"), comment: ""\)

$1.localized
Xcode Storage
看到你有 Xcode 。那么推荐你先试试八爷开发的 Cleaner For Xcode 。另外,一般的清理也可以使用 Disk Drill 以及 Cleaner One Pro ,这两个的免费版就足够使用了。
.xip file
A XIP file is analogous to zip file, but allows for a digital signature to be embedded and be verified on the receiving system, before the archive is expanded.
Xcode Copy if needed
Xcode中拖入资源弹出的窗口
“Failed to prepare device for development.”
StackOverflow
- Check /Applications/Xcode.app/Contents/Developer/Platforms/iPhoneOS.platform/DeviceSupport/ for directory name 15.4 (your iOS version).
- If the directory is missing download support files for 15.4 (your iOS version) from https://github.com/filsv/iPhoneOSDeviceSupport and place it in the above path.
- Restart Xcode.
Localize
https://developer.apple.com/documentation/xcode/exporting-localizations

https://zhiying.space/posts/ios-localization/
Zhiying’s iOS Star
iOS 项目国际化 Localization
随着 Apple 对多语言用户使用体验的不断提升,从 iOS13 开始用户可以在应用设置中单独设置区别于系统的语言,同时对于开发者来说,对于多语言的适配体验也在不断的得到提升,本文将逐步说明如何对 iOS 项目做国际化支持。

http://swiftcafe.io/post/ios-localize
NSLocalizedString 多语言本地化 - SwiftCafe 享受代码的乐趣
iOS 多语言的标准库,看看有多少你还不了解的。

https://youtu.be/yZO-QTBwsNs
YouTube
Indently
Adding Translations to iPhone Apps in SwiftUI (Tutorial)

https://nilcoalescing.com/blog/ExportingAndImportingLocalizations/
只有 infoplist 文件
Button("Log in") { // localizable string
    // perform login
}

Button {
    // perform login
} label: {
    Text("Log in", comment: "A button to perform login")
}
Multi Language SwiftUI App
Button("Change Language") {
    if let url = URL(string: UIApplication.openSettingsURLString) {
        UIApplication.shared.open(url)
    }
}
Private API Call
FLEX on GitHub
Swift Package Manager
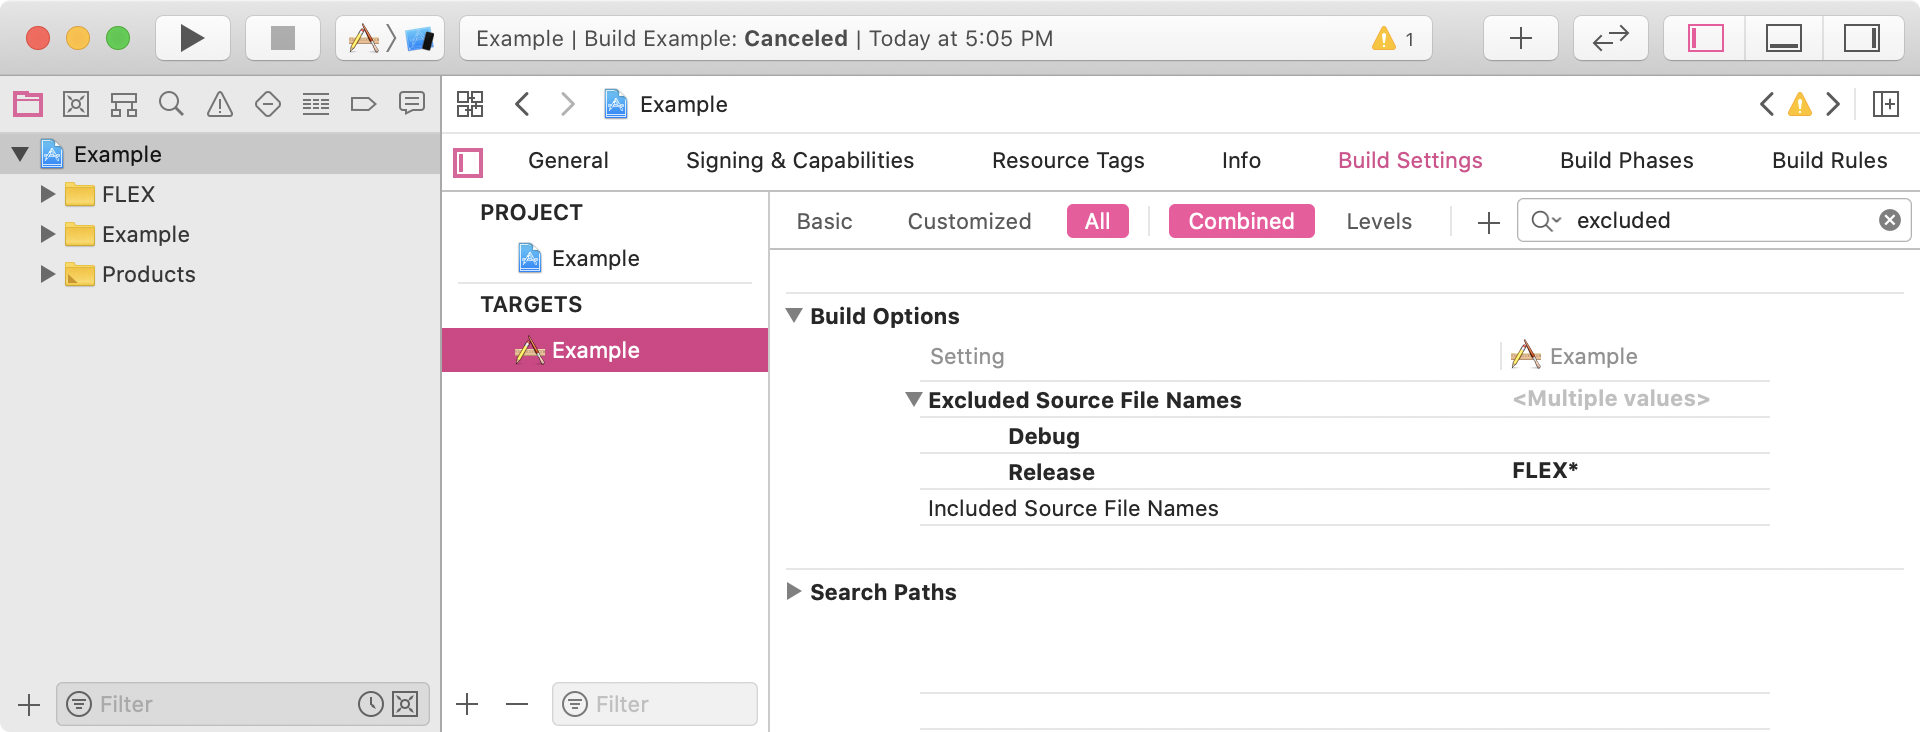
In Xcode, navigate to Build Settings > Build Options > Excluded Source File Names. For your Release configuration, set it to FLEX* like this to exclude all files with the FLEX prefix:
PDiOS: Private API Call Detection in iOS Applications
iOS14 时钟组件怎么做到实时更新
私有 api:

some View
._clockHandRotationEffect(.hourHand, in: TimeZone, anchor: .center)

只能帮你到这里了。
Xcode Build Scheme
Customizing the build schemes for a project
iOS Device Model
iPhone/iPad苹果设备型号对应常用名称列表(2022更新至iPhone 14 Pro Max | iPad Air 5 | iPad10 | iPad Pro 12.9-inch 6)
iPhone 10,3 iPhone X
Debug Technique
Xcode LLDB po
How to print out a property’s contents using Xcode debugger?
Attach Device
xcode无线调试之attach
试想以下如下两种场景:
场景一:测试发现一个bug,需要debug追加断点
场景二:需要反复断点调试涉及前后台切换,重启App、唤起App操作,但又不需要重新编译。

我们是只能打开工程连上设备,一遍一遍的command+r吗?
如此低效率怎能接受?!
此时如果采用attach方式来将debugger连接到app姿势将足够帅,具体做法如下:

1.把你的测试设备连接(无线或者数据线)到Mac上并打开xcode工程
2.选择你的测试设备作为目标设备
3.xcode左上角工具栏选择Debug --> Attach to Process by PID or Name
在对话框表中,输入通过 需要调试的app进程名字即productname
4.在测试设备上打开app并操作

再试想场景一:如果发现了bug(非crash类型),我们又担心重启app不能复现bug此时应该怎么办呢?
此时我们可以用到Debug-->Attach to Process,具体操作如下:

1.把你的测试设备连接(无线或者数据线)到Mac上并打开xcode工程
2.选择你的测试设备作为目标设备
3.xcode左上角工具栏选择Debug --> Attach to Process
等待getting process list完成之后在列表中选择app对应的进程名
4.在测试设备上继续操作
Xcode shortcut
Xcode Shortcut
Jump to Definition (⌃ + ⌘ + J or ⌃ + ⌘ + Click)
Find Selected Symbol in Workspace (⇧ + ⌃ + ⌘ + F)
Find Selected Symbol in Workspace (⇧ + ⌃ + ⌘ + F)
This is essentially the opposite of Jump to definition, and it’s particularly helpful trying to understand how an API is used in the codebase. It also gives you an feeling for how much grief you’re going to cause your teammates (or other API consumers) when refactoring an API…!
Find Call Hierarchy (⇧ + ⌃ + ⌘ + H)
Similar to Find selected symbol in workspace, but with a focus on methods, this shortcut will open the Call Hierarchy view to show any places in your code that call the specified method, as well as any methods that call those methods in turn, and so on.
Toggle Views
Xcode has three main areas surrounding the code editor, which can be toggled to make more space for editing (or showing context information, just as required): Left: Navigator (⌘ + 0) Right: Inspectors (⌘ + ⌥ + 0) * Bottom: Debug (⇧ + ⌘ + Y)
| Area | Command | Shortcut |
|---|
| Editor | Code completion | ⌃ + Space |
| Editor | Move line up | ⌥ + ⌘ + [ |
| Editor | Move line down | ⌥ + ⌘ + ] |
| Editor | Delete entire line (*) | ⌘ + D |
| Editor | Comment line / selection | ⌘ + / |
| Editor | Balance indent | ⌃ + I |
| Navigation | Go back | ⌃ + ⌘ + ← |
| Navigation | Go forward | ⌃ + ⌘ + → |
| Navigation | Jump to definition | ⌃ + ⌘ + J |
| Navigation | Find selected symbol in workspace | ⇧ + ⌃ + ⌘ + F |
| Navigation | Find call hierarchy | ⇧ + ⌃ + ⌘ + H |
| Navigation | Open quickly | ⇧ + ⌘ + O |
| Navigation | Jump to line | ⌘ + L |
| Navigation | Show document items | ⌃ + 6 |
| Views | Toggle canvas | ⌥ + ⌘ + ↩ |
| Views | Toggle Navigator | ⌘ + 0 |
| Views | Toggle Inspectors | ⌘ + ⌥ + 0 |
| Views | Toogle Debug area | ⇧ + ⌘ + Y |
| Settings | Open settings dialog | ⌘ + , |
Warning
IPHONEOS_DEPLOYMENT_TARGET
The iOS Simulator deployment target ‘IPHONEOS_DEPLOYMENT_TARGET’ is set to 10.0, but the range of supported deployment target versions is 11.0 to 16.4.99.
该问题意味着你的项目或某些依赖项(在你的案例中是 Pods)设置的 iOS Deployment Target 版本(部署目标版本)过低,而 Xcode 支持的最低版本比这个设置高。在你的情况中,某个 Pod 的 Deployment Target 设置为了 10.0,而你当前的 Xcode 支持的最低 iOS Deployment Target 版本是 11.0。
要解决此问题,你需要将低于 Xcode 支持的最低 iOS 版本的 Deployment Target 提升到至少 11.0。以下是操作步骤:
打开你的 Xcode 项目或工作区。
如果问题在 Pods 中出现,打开 Pods 项目,找到那个 Deployment Target 设置为 10.0 的 Pod target。
在项目或 Pod target 的 General 或 Build Settings 面板中,找到 Deployment Info 或 Deployment Target 部分。
将 iOS Deployment Target 改为至少 11.0。
如果你无法确定是哪个 Pod 有问题,你可能需要查看一下 Podfile 文件,看看是否有全局的 platform 设置,如果有,更新这个设置可能会更简单。例如,你可以在 Podfile 中添加或更新如下行:
然后重新运行 pod install。
请注意,提升 Deployment Target 版本可能会影响你的 app 对旧设备的支持。在提升版本前,确保了解这个改变可能带来的影响。
Xcode Simulator Installation
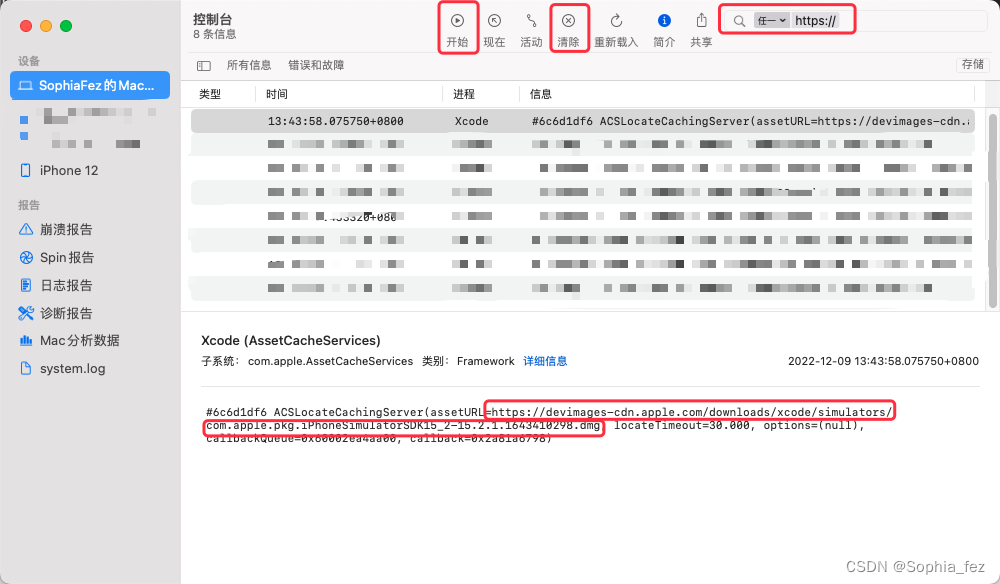
Xcode安装特定版本系统的模拟器(不支持断点下载所以总是下载失败)
